The Polaris PB4-60 pool pump is an essential component in ensuring clean, circulating water in your pool. At the heart of this system lies the volute, a carefully engineered spiral casing that directs water flow from the impeller to the discharge line. While replacing or installing a new volute may seem straightforward, it requires precise attention to detail. Improper installation can result in leaks, poor water circulation, or even motor damage. This guide dives deep into technical instructions, step-by-step installation, maintenance best practices, and troubleshooting techniques, along with diagram suggestions for clarity.
Understanding the Polaris PB4-60 Pump: Design and Functionality
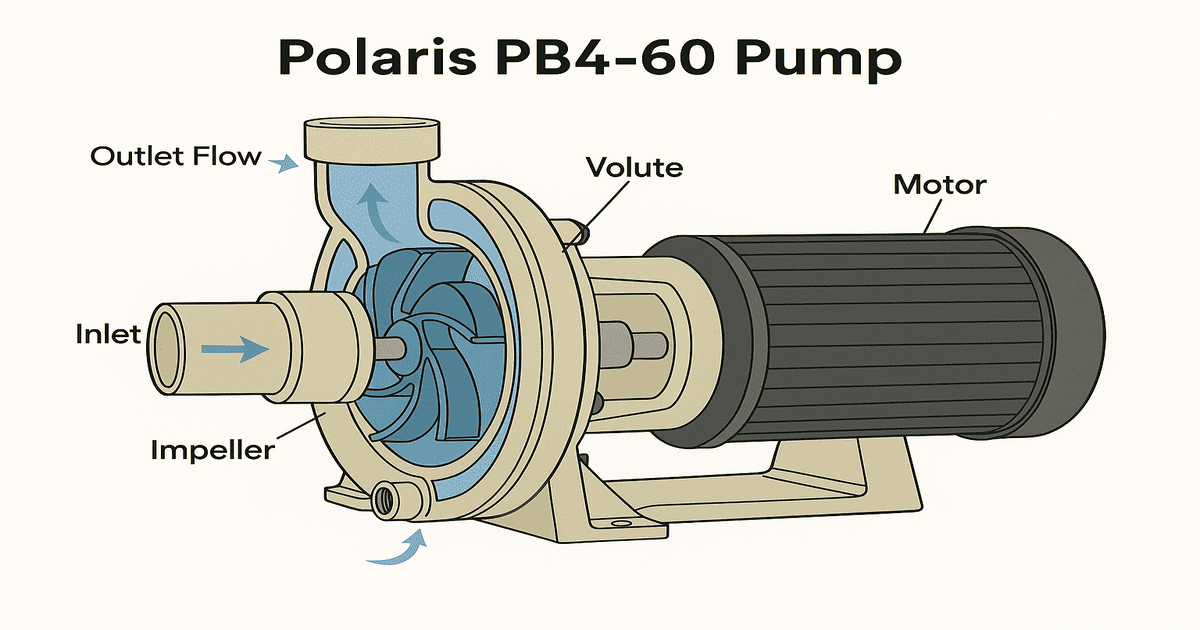
Before tackling installation, it’s important to fully understand the Polaris PB4-60 pump. It is engineered for reliable operation in residential pools and small commercial setups. The motor is designed for continuous use, and the pump housing is optimized for minimal energy loss while maintaining high flow rates.
The volute is a central component. It has a spiral design that gradually increases the cross-sectional area as water moves from the impeller. This design converts the impeller’s kinetic energy into pressure, ensuring smooth water movement. Technical features include:
- Impeller Compatibility: Polaris PB4-60 impellers are precision-machined to match the volute curvature. Misalignment leads to cavitation, vibration, and decreased efficiency.
- Seal Integration: O-rings and gaskets prevent leaks, maintaining hydraulic pressure.
- Debris Handling: The volute’s curvature minimizes sediment buildup while directing water evenly.
Essential Tools and Materials for Technical Installation
Having precise tools is critical for technical installation. Beyond standard wrenches and screwdrivers, consider:
- Torque Wrench: Ensures bolts are tightened to manufacturer-recommended torque specifications.
- Silicone Grease: For lubricating O-rings without degrading rubber seals.
- Thread Sealant or PTFE Tape: Protects threaded connections from leaks.
- Magnetic Pickup Tool: Useful for removing small metal debris from the housing.
- Inspection Mirror or Flashlight: To verify alignment in tight spaces.
Replacement Parts Checklist:
- OEM Polaris PB4-60 volute (always use genuine parts for optimal fit)
- High-quality gaskets and O-rings (avoid aftermarket parts that can deform)
- Optional: anti-corrosion spray for long-term protection
Safety measures include wearing insulated gloves, disconnecting power at the breaker, and draining the pump housing before any work begins.
Technical Step-by-Step Polaris PB4-60 Volute Installation
Step 1: Preparing the Pump and Work Area
Turn off the pump and disconnect it from its electrical supply. Drain the housing completely. Technically, even a small amount of residual water can cause hydraulic issues when the pump restarts. Clean the surrounding area, removing any debris or sediment. For advanced users, you may measure the inlet and outlet pipe alignment using a laser level to ensure perfect alignment before reinstalling the volute.
Installation Tip: Position the pump at a height that allows gravity drainage, reducing residual water in hard-to-reach corners.
Step 2: Removing the Existing Volute
Carefully remove all bolts securing the old volute. Use a torque wrench in reverse to avoid stripping threads. Remove the gasket and O-rings, inspecting them for signs of wear or chemical degradation. If the old volute is stuck, gently tap the housing with a rubber mallet to loosen it, avoiding damage to the impeller or pump housing.
Troubleshooting Example: If the volute is difficult to remove, applying a warm compress (or warm water) around the housing can slightly expand the metal, easing removal.
Step 3: Preparing the New Volute for Installation
Before installing, inspect the new volute for machining defects such as burrs, scratches, or warping. Verify the impeller fits snugly within the new volute. Apply a thin layer of silicone lubricant on the O-rings and gaskets. Misaligned or dry seals are a leading cause of leaks.
Installation Tip: Dry-fit the volute without tightening bolts first to check for proper alignment. Use a straightedge to ensure the volute’s lip aligns perfectly with the pump flange.
Suggested Diagram: Exploded view of volute installation showing bolt placement, gasket/O-ring position, and impeller alignment.
Step 4: Installing the Volute with Precision
Carefully position the volute over the impeller and into the pump housing. Insert the prepared gaskets and O-rings carefully. Begin tightening bolts gradually using a cross-pattern sequence. This ensures even pressure and prevents distortion. Using a torque wrench set to manufacturer specifications ensures bolts are neither under- nor over-tightened.
Installation Tip: After initial tightening, rotate the impeller by hand to ensure it moves freely within the volute. Any resistance may indicate misalignment or trapped debris.
Step 5: Reconnecting Plumbing and Testing
Reconnect inlet and outlet plumbing, applying PTFE tape or thread sealant as needed. Restore power and run the pump. Monitor pressure gauges and water flow rates to confirm proper operation. Look for vibration or unusual noise, which often indicate slight misalignment. Check for leaks around seals and gaskets during the first 15 minutes of operation.
Troubleshooting Example: If you notice reduced flow, inspect the volute’s interior for debris or partial obstruction. In some cases, trapped air in the volute can cause cavitation, which may require manual priming to release air pockets.
Advanced Maintenance Tips for Maximum Longevity
Beyond standard cleaning, advanced maintenance includes:
- Volute Inspection: Use a flashlight and inspection mirror to check the internal spiral for wear, corrosion, or small cracks.
- Impeller Clearance Check: Measure the gap between the impeller and volute to maintain optimal hydraulic efficiency.
- Seal Lubrication: Apply silicone grease to gaskets and O-rings every 6 months to prevent shrinkage.
- Seasonal Winterization: Fully drain and protect pump components during freezing temperatures to prevent cracking.
Installation Tip: Keep a maintenance log detailing installation dates, torque values, and observed issues. This helps identify trends and predict maintenance needs before failures occur.
Common Installation Mistakes and How to Avoid Them
Technical precision is key. Common errors include:
- Over-tightening Bolts: Can warp the volute or crack housing. Always use a torque wrench.
- Misaligned Gaskets: Even a small displacement can cause leaks and reduced efficiency.
- Running the Pump Dry: This can cause severe impeller and motor damage. Always prime the pump before powering it.
- Ignoring Debris: Small pebbles or dirt left inside can cause vibration, noise, and premature wear.
By paying attention to these common issues, you reduce the risk of mechanical failure and extend pump life.
Troubleshooting Technical Issues
Even a perfectly installed volute may occasionally present issues. Here’s a detailed guide for troubleshooting:
- Pump Not Priming: Likely caused by air leaks in the suction line. Tighten all fittings and ensure the pump housing is full of water.
- Excessive Noise or Vibration: Often indicates misalignment between the impeller and volute or foreign debris. Remove and check for obstruction.
- Reduced Flow Rate: Inspect volute and impeller for wear, check for partially blocked pipes, and verify pump voltage.
- Leaks: Usually from improperly seated gaskets or O-rings. Re-seat seals and retorque bolts using the proper sequence.
Suggested Diagram: Flowchart showing troubleshooting steps, from detecting issues to resolving them systematically.
FAQs About Polaris PB4-60 Pump Volute Installation
Can I replace the volute myself?
Yes, technically skilled DIYers can replace it, provided they follow safety precautions and understand impeller alignment.
How often should the volute be replaced?
Typically, 5–10 years depending on pool usage, chemical exposure, and maintenance. Regular inspection can prolong life.
What if I notice leaks post-installation?
Check gasket alignment, retighten bolts with correct torque, and ensure no debris is obstructing the seal.
Will misalignment damage the motor?
Yes, it can create vibration and cavitation, potentially overheating and damaging the motor.
Are aftermarket volutes recommended?
OEM Polaris parts are strongly recommended to ensure precise fit, alignment, and long-term durability.
Conclusion
Installing a Polaris PB4-60 pump volute with precision ensures efficient water flow, prevents mechanical failures, and prolongs the life of your pump. By following this highly detailed guide, using proper tools, and implementing advanced maintenance techniques, you can achieve reliable pool performance. Technical attention to detail, including proper torque, alignment checks, and seal lubrication, is critical for long-term success. With consistent inspection, troubleshooting, and maintenance, your Polaris PB4-60 pump will continue to deliver crystal-clear, efficiently circulated water for years.
You May Also Like: Heardfurball852: The Viral Internet Trend You Need to Know